#
01-01 12V Batteries Inspection
Make sure that the battery terminals are not corroded and that there are no loose connections (pull test), cracks, or loose clamps.
#
MP-01-61-00-00-001: Inspection of the 12V batteries, cables and connections
- Make sure the work can be done safely.
- Deactivate the high voltage circuit as per the MP-01-05-00-00-001 High Voltage Circuit Deactivation Procedure for LG batteries or MP-01-05-00-00-002 High-voltage Circuit Deactivation Procedure for BMW batteries.
Batteries contain a very dangerous liquid if splashed in the eyes or on the skin. Always wear a face shield and protective clothing when working near batteries.
- Disconnect the 12V batteries.
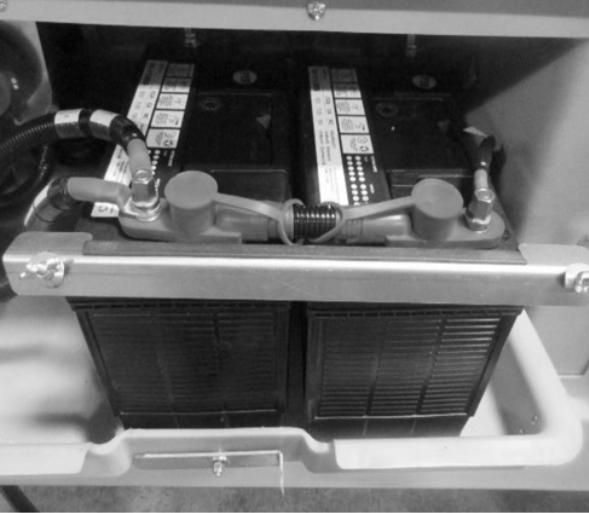
- With a voltmeter, make sure each battery produces 12 Vdc.
- If the batteries do not have 12V, follow the RP-01-61-00-00-001 Troubleshooting of the low-voltage Electrical System to find the issue. In the case where the batteries must be replaced, do it as per RP-01-63-00-00-001 12V Battery Replacement.
Wiring that is damaged, worn by friction, or excessive radius can break and cause short circuits that can lead to a fire. Make sure that cables are routed properly, and connections are always clean and tight.
- Inspect all the cables connected to the battery on all their length for wear, chafing, or excessive radius and that they are always held securely in place.
- If an excessive radius exists, reroute the cable with the appropriate slack.
- Verify the condition of the cable ties. If they are loose, tighten them and if they are broken, replace them.
- Make sure the cable insulation is not discolored or shows signs of overheating. If so, the damaged cable will need to be replaced as per the
RP-01-61-00-00-003 Low-voltage Harness Replacement.
- Also, check the battery tray to make sure it is in good condition. Make sure the tray is free of foreign objects such as stones or any other road debris.
- After cleaning, reconnect the cables to the batteries and tighten the terminals to the specified torque. Coat the terminals with dielectric grease.
- Verify the ground cable connection to the chassis.